
 English (CA)
 English (USA)
Parcel Guard Support
Features, Setup & Installation Video
Installation Instructions
There are two methods that can be used to install the Danby Parcel Guard, depending on what installation location is available. Decide which option is best for your chosen location and follow the steps below.
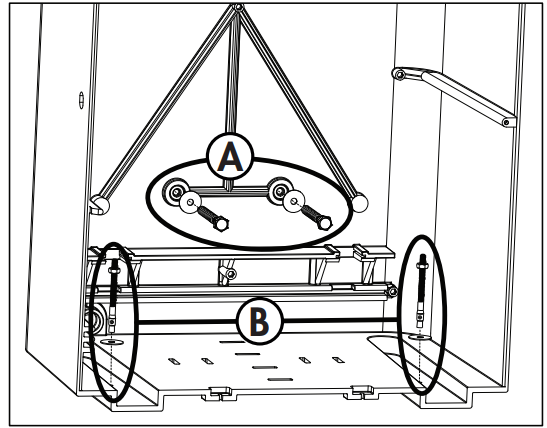
A. Secured through the rear
- Use a power drill and a 1/4” drill bit to create
holes in the marked locations on the back wall
of the Danby Parcel Guard. - Place the Danby Parcel Guard against the wall or
structure that it will be secured to. - Use a pen or pencil to mark the hole locations
through the drilled holes. - Move the Danby Parcel Guard out of the way and then
use a power drill and a 1/4” drill bit to create
guide holes for the bolts or screws, at least 2.5”
deep for wood screws and at least 3.75” deep
for concrete bolts. - Replace the Danby Parcel Guard and insert the wood
screws or concrete bolts with washers into the
holes. Use a wrench to tighten the wood screw.
Tighten the nut on the concrete bolts and the
sleeves will expand to secure the bolt.
B. Secured through the bottom
- Remove the platform at the bottom of the Parcel
Guard. Two holes are pre-drilled in the bottom
of the box. - Place the Danby Parcel Guard on the floor or structure
that it will be secured to. - Use a pen or pencil to mark the hole locations
through the drilled holes. - Move the Danby Parcel Guard out of the way and then
use a power drill and a 1/4” drill bit to create
guide holes for the bolts or screws, at least 2.5”
deep for wood screws and at least 3.75” deep
for concrete bolts. - Replace the Danby Parcel Guard and insert the wood
screws or concrete bolts with washers into the
holes. Use a wrench to tighten the wood screw.
Tighten the nut on the concrete bolts and the
sleeves will expand to secure the bolt.
Danby Parcel Guard Application Setup
1. Install the Danby Parcel Guard App
Use the App Store and Google Play links below to download the application to your device.


2) Allow Notifications
Once you’ve downloaded your Danby Parcel Guard app, you will be asked to enable notification on the first launch. Enabling notifications gives your Danby Parcel Guard the ability to update you on activity happening with or near your Danby Parcel Guard. This will allow the app to send you delivery updates, motion detected and software update notifications!

3) Create your account, or sign into an existing account
Upon setup you will be asked to create or sign in to an existing account. If this is your first Danby Parcel Guard then you will need to create an account. If you already own a Danby Parcel Guard you can sign into your existing account.
4) Connect your phone to the Danby Parcel Guard Hotspot
In order to setup your Danby Parcel guard to your network, we first need to communicate with the device directly. To do this, we need to connect to the device’s active hotspot.
The best way to complete this is go to your phone settings, and go to your network settings. You should see a wireless network that starts with “DNBC_”
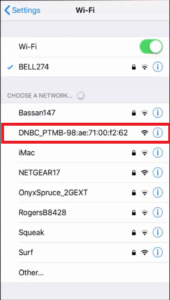
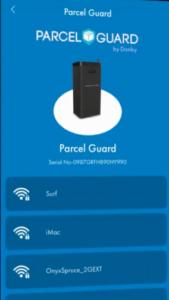
5) Join the Danby Parcel Guard to your network
Once you are connected to your Danby Parcel Guard, return to the application setup screen. You should see the following screen with your serial number of your unit.
Scroll though the list until you find your home network. If you cannot find your network, please see troubleshooting section of “Can’t locate my network”
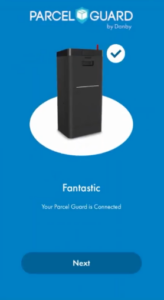
6) Initial Setup Complete
If you get the following screen, you have completed your setup and your Danby Parcel Guard is ready to use.
If you weren’t able to complete setup. Please see our troubleshooting guide here, or contact us
Troubleshooting
| LED Lights | Device Mode |
|---|---|
| Steady Magenta | AP Mode |
| Green blink every 1 sec | Device is attempting to connect to a router |
| Magenta blink every 1 sec | Device connected to router but no internet connectivity |
| Blue blink every 1 sec | Device trying to register to cloud |
| Steady Blue | Device Registered on Cloud |
| Yellow blink every 1 sec | Barcode Scanning |
| White blink | Motion detection |
| Cyan blink every 1 sec | Firmware Upgrading |
| Red blink every 1 sec | Theft detection |
| Yellow LED Steady | Factory Reset/Board Powered up |
- A fuse may be blown or the circuit breaker tripped
- Plug not fully inserted into the wall outlet
- The battery needs to be replaced
- Check the wireless signal strength
- Ensure that the internet upload speed available is >1Mbps
- If the temperature is very cold, the lock may have frozen
- The lock may need to be oiled
- Ensure the lock on the lower door is fully engaged
- Unlock the door, open and close the door to ensure it is fully closed, then try to lock it again
Ensure the lower compartment is empty and that there are no packages blocking the closing mechanism
To reset the unit press and hold the reset button, located inside the unit behind the lock, for 30 seconds.
Google Home/Amazon Alexa Voice Assistant Set-up
- On Cloud , Alexa Skills and Google Home Actions are
integrated - User can link the Danby account with both voice apps and fetch below data:
- Count of expected parcels by Danby Parcel Guard name and specific date
- Count of recently delivered parcels in the last 24 hours.
- Unlock the Danby Parcel Guard using four digit voice pin [ This is mandatory to unlock Danby Parcel Guard lid and also its standard followed by the skills to have pin functionality]
- Reset the four digit voice pin
- Install Amazon Alexa app from play store
- Login using Amazon account and add Amazon Echo device in Amazon Alexa app
- Navigate to Menu->Skills and Games -> Search for “Danby Parcel Guard” and select Danby Parcel Guard skill.
- To Link Account -> Click on “Enable to Use” and the user will be navigated to Danby Sign-In Page.
- Enter Danby account credentials and Danby Parcel Guard will be successfully linked.
- Reset the four digit voice pin
- Users can ask to unlock, and count number of expected parcels or recently delivered parcels.
- E.g – To know expected parcels count –
- “Alexa, Open Danby Parcel Guard
- “Expected parcels for me or Expected parcels for device <devicename> “
- E.g – To open Danby Parcel Guard –
- “Alexa, Open Danby Parcel Guard”
- “Alexa, Open Danby Parcel Guard”
Note: Google Home only supports Google Accounts and G-Suite Accounts.
- Install Google Home app and login using Google Account or G-Suite
Account - Add Google Home Device
- Ask Google Home, “Open Danby Parcel Guard”, it tells to link Danby account by giving the pop-up link/push notification on respective google account in mobile app.
- Click on the link and the user will be navigated to Danby sign-in page.
- Login with Danby account credentials and your account will be linked successfully.
After the account is linked successfully, it shows the list of Google Actions to communicate.
Say , “Hey Google, Open Danby Parcel Guard” -> This will open the Danby Parcel Guard action and then users can unlock, find count of expected and recently delivered parcels.
Eg. To unlock lid of Danby Parcel Guard
- Say “hey Google, unlock my mailbox”
- Once Google asks the device name, say the device name. Eg. ‘Smith Family’
- On asking the pin, say the valid four digit voice pin. Then, Danby Parcel Guard will unlocked