
 English (CA)
 English (USA)
 English (UK)
 Spanish (MX)
When it comes to beer, one of the most important things to get right is temperature. After all, there’s nothing sadder than an otherwise perfect brew getting ruined by less-than-ideal serving conditions. The best bartenders and brewpub managers have this down to an art, of course, but what’s a dedicated beer drinker to do with all those bottles at home? What’s the best way to store beer?
Proper beer storage is the key to a great drinking experience, and the right storage temperature will make any beer taste its best. Here’s what you need to know to get the maximum flavor out of everything from a barleywine to a Budweiser.
What’s The Best Way To Store Beer?
To prevent flavor loss and make sure your beer tastes exactly like it should, you should keep the bottles at a steady 50 to 55 degrees Fahrenheit (10 – 13 Celsius). This is known as the “cellar temperature,” though you don’t need to have a cave in your basement to make this work. In fact, any well-designed beer fridge will allow you to keep the temperature in this range. A good beer fridge or beverage center will also protect the bottles from damaging UV rays.
One quick note — many people will advise storing beer upright for long periods of time (cellaring) to prevent leaking or yeast buildup on the vessel’s wall. However, other than those rare occurrences, storing beer horizontally won’t ruin your favorite brew.

Should I Store Beer At Room Temperature?
Did you notice that we’re not recommending any beer be stored or served at room temperature? That’s because, as modern people, we have pretty high expectations for comfort, and room temperature has crept up over the years. You probably keep your living room at around 72 degrees. For brewers in the Middle Ages, that’s positively balmy!
Because of this, it’s no longer accurate to say that a beer is best stored or served at room temperature, unless you live in an igloo. Keep your beers chilled to an old-fashioned beer cellar temperature — usually about 50 degrees year-round — and you’ll be much closer to the mark.
It’s also good to remember that your beer will warm up gradually as it sits in the glass. To allow for a longer sipping session, it makes sense to pour it on the colder end of your preferred range so you can enjoy it as it slowly warms.

What’s The Ideal Temperature To Store And Serve Beer?
Keeping all your beer chilled to at least 50 or 55 degrees will allow it to stay fresh for a while, but that’s not necessarily the optimum temperature for drinking. To get the full experience, you need to have the right balance of cool refreshment and the warmth that brings out the delicate balance of flavors and aromas.
Freezing your tongue with an over-iced beer will kill your ability to enjoy it as it was meant to be tasted. So, what’s a beer aficionado to do?
We think it’s easiest to store beer at the same temperature you wish to serve it so that it’s ready whenever you are. This is easily managed by adjusting the temperatures on your beer fridge based on the style of beer you keep in it.
An Easy Guide To Beer Serving Temperatures:
We’ll start with the beers that taste best ice-cold and move into warmer climates (all discussed in terms of Fahrenheit).
- 35 to 40 Degrees (Macros): This is very cold—almost tongue-numbing. The only beers that you should keep on ice or in your food fridge are mass-market drinks like Bud and Coors. This also works for non-alcoholic beers, too.
- 40 to 50 Degrees (Wheat Beers & Pilsners): This is still noticeably cold, but it’s not icy. This temperature is for light-bodied wheat beers and German pilsners that are meant to go down easy. Cold temperatures also make sense for craft beers with fruit flavors—think summer specials. You could also chill a pale lager to this level, but be careful not to go too cold or you might flatten out the complexity.
- 45 to 50 Degrees (IPAs & Lagers): IPAs of all nationalities belong in this temperature range. The colder the temperatures, the more bitterness you’ll taste, so be careful. If you’re storing an extra-hoppy pale ale, you’ll want to serve it on the warm end of this range. (Of course, if you love the pucker, you can adjust to your own taste.) Many lagers do well in this range, too.
- 45 to 55 Degrees (Porters & Stouts): Porters and stouts usually present a balanced flavor profile that blend the bitterness of hops with the sweetness of malt. These brown beers also tend to have a higher alcohol content, which means you can store and serve them at higher temperatures than an IPA — but they should be well under room temperature.
- 50 to 55 Degrees (Sours & Bocks): As a rule of thumb, ales should be served warmer than lagers to allow all their complexity to come through on the palate. This includes sour ales and bocks. They have an even higher alcohol content and can therefore stand up to storage at 55 degrees without off-flavors.
- 55 to 60 Degrees (Barleywines & Strong Ales): High-alcohol beers like strong ales, imperial stouts and barleywines can last for years without much chill—it’s what they were designed to do in the days before refrigeration. They are best served just slightly under room temperature.
If you’re looking for craft beer to add to your beer fridge, check out Tavour! Download the Tavour App here to get access to hard-to-find, 100% independent craft beer from across the US. New beers are shared every day. Build your own custom box of the craft beers you love, or enroll in a beer subscription and they’ll automatically snag the highest-rated beers that suit your taste. No minimums or commitments. And, get your hand-picked beer delivered right to your doorstep for a flat fee (yep, any amount). Or ship for free with a subscription!

Independent craft breweries put extra care into every IPA, Stout and Sour they create, because they’re dedicated to the art of brewing – an art they take great pride in. At Tavour, you can be a part of a dedicated community of beer drinkers who stand with independent breweries. When you choose to support craft beer, you’re helping fuel passion and innovation – with delicious results!
Follow them on Instagram here!
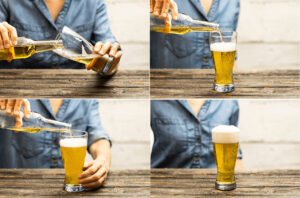
How to pour beer:
If you’re into beer, you’ve probably spent some quality time staring lovingly into those sparkling bubbles. And in the early 1990s, so did a pair of Stanford University physicists, who decided to do some scientific sleuthing into what made them tick. Their verdict: “Once you begin to learn about the nature of beer bubbles, you will never again look at a glass of beer in quite the same way.”
Turns out, those teensy carbon dioxide bubbles (about 0.3 millimeter across, to be precise) do so much for us. Beyond making your brew attractive and appetizing, a healthy head of foam preserves the flavour of the liquid beer underneath. The bubbles also release aromas into the air, which helps you get a read on your drink before you even take a sip. Some cicerones (a.k.a. beer sommeliers) even believe a poorly poured brew can unsettle your stomach, so it pays to get it right!
Pouring a proper beer is simple once you get the hang of it. The steps below work for at least 95 per cent of the beers you’ll come across. Master this technique first, and then try out the exceptions.
The standard pour:
The goal: Achieve a 1 to 1½-inch (2.5 to 4 cm) head on the top of the beer.
Step-by-step instructions:
1. Start with a clean glass. Rinse (but don’t dry) it under cool running water to clear away any dust or detergent residue, which can get in the way of a nice, fluffy finish.
2. Hold the glass at a 45-degree angle and pour.
3. Starting about halfway through the pour, gradually adjust the angle of the glass upward as the head builds.
4. Complete the pour with the glass in the vertical position. Enjoy!
Exception #1: Pouring nitro stouts and ales
Most beers get their effervescence from straight-up carbon dioxide. Nitro beers, on the other hand, contain a mix of dissolved nitrogen and carbon dioxide. When this combo encounters air, it creates a nice, frothy stream of bubbles. Nitrogen bubbles give beer a silky-smooth texture, but the trade-off is that the bubbles are smaller than carbon dioxide ones, and can stick around longer.
The goal: Achieve a white, foamy head on top and refreshing liquid beer underneath.
Step-by-step instructions:
1. Start with a clean glass. Rinse it under cool running water, just as for a standard pour.
2. If the can label tells you to invert or shake it, do so.
3. Open the can and hold the glass at a 45-degree angle. Start pouring. Note: Some beer experts prefer to pour “hard,” which means holding the can vertically instead of at a 45-degree angle. Go ahead and try this if you like but watch what you’re doing to avoid overflows.
4. About three-quarters of the way through the pour, stop and place the glass on the counter. Wait for the head to settle and create a crisp, white line on top of the liquid beer. This takes around 30 seconds, though some prefer to wait even longer.
5. Pour the rest of the beer into the glass. You can pour a little more vertically (or completely vertically) now, as you let the head build up to the desired level. Admire and have a sip.
Exception #2: Pouring pale wheat beers
Pale wheat beers are sometimes identified by their European names, including witbier (white beer) and hefeweizen. These beauties are often very frothy. The tradition is to go with the flow and serve them with big, fluffy, meringue-style heads (think three fingers high!). Many pale wheat beers are bottled without being filtered, or “on the lees,” which means the yeast is still in the bottle.
The goal: Achieve a thick, frothy head on top with liquid beer underneath.
Step-by-step instructions:
1. Start with a clean glass. Rinse it under cool running water, just as for a standard pour.
2. Hold the glass so that it’s nearly horizontal — try about a 30-degree angle.
3. Stick the end of the bottle (or, rarely, can) into the glass and pour slowly, gradually tilting the glass upward as you go. You can even keep the neck or top of the container right in the beer if you like.
4. About three-quarters of the way through the pour, stop, remove the container and place the glass on the counter. Wait a few seconds for the head to settle. If your brew is on the lees, consider swirling the bottle to mix the yeast back in.
5. Pour the rest of the beer vertically into the glass to create a thick head. Cheers!
Make sure your glass is clean.
Before you pour, dip the glass into clear water, then turn upside down and let drain. If there are any traces of lipstick, soap, grease or oil on the surface, the water will break into streaks or drops. If the glass is clean, you’ll see a perfect, clear film cover the entire surface.
Serve beer in a wet glass that’s been washed in a mild detergent and rinsed several times in warm water. To prime your glass for a rich head, rinse it in pure, cold water just before you pour.
Blog content inspired by HOP CULTURE and THE BEER STORE.
Not yet following us on social media? Check us out on Facebook, Twitter, Instagram, Pinterest and LinkedIn, or subscribe to our YouTube channel!


